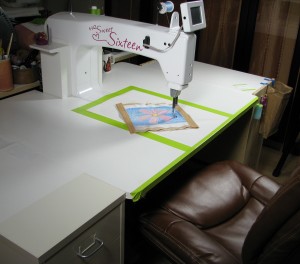
I’m videoing more in the studio and so I needed to rearrange the space, again. This turned out to be great. Besides cleaning up those sneaky dust bunnies I ended up moving existing (Ikea) cabinets to the sides of my HQ Sweet Sixteen.

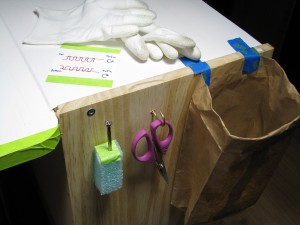
They are the perfect height and extend the surface about two feet, eliminating much of the drag on larger quilt projects. But it also meant I no longer had the small drawer unit at my right. No problem, just stick the three items most used on the outside of the wooden cabinet that is now on my right – The little screw driver for the bobbin tension, clipping scissors and a bag for thread bits. I’m back in business!

I’m quilting an art quilt now that has over fifteen different thread colors (four different brands) and I have gotten really fast at changing the thread; top and bobbin, and adjusting the tension. Did you notice the little drawing by the gloves in the photo (in image 2)? Even though I have adjusted the top thread tension assembly many times, I still seem to have a brain burp when it comes to which way to turn the dial. When I bought my machine the wonderful sales person draw this little picture in my manual for quick reference. Most people would probably have it memorized but a quick glance at this little drawing works for me.
How have you made your sewing or quilting space work for you?

I have a counter , supported by restore bathroom vanity ( sans top) and 2×4 legs, ( nicely painted), that fits into the corner of my laundry/sewing room. There are 2 cut outs in the counter. One is for my Janome 6500, on which l do my piecing, home Dec sewing , & costumes/clothes. The other is a big enough cut out for my 15″ Bailey when it’s not being used in my frame. There’s lots of room on both sides of each of these to support large projects. When not being used for the Bailey, that second cut out is handy for my serger, or my portable hemmer.The vanity drawers and cupboards hold embroidery threads ( my embroidery machine just sits on top of the counter), stabilizers, and my hemmer & serger when not in use. I also have a little cabinet with drawers that fits under the counter that stores tools, snips,bobbins, manuals, patterns etc. And best of all, my hubby built me a large cutting/pressing unit on casters. There’s room in the “box” underneath for my stash of fabric bins, drawers for scissors, shears, rotary tools, pens, clamps , pins etc.The ends are made of pegboard to hang up those weird things l seldom use but need handy (tube turning hook, u-shape grips for fmq). The plywood top is covered with batting then canvas for pressing. I use it for cutting by putting on the huge cutting mat that fits it exactly plus a smaller one on top of that. I use it for folding laundry by flipping over the big cutting mat, or storing it leaned against the wall just behind the table. Last year, we installed “daylight” florescent fixtures in the drop tile ceiling…as it’s a basement room.
Riana,
Wow your space sounds fantastic – organized and well functioning! Do you have photos posted anywhere… don’t we all love to see other peoples studios! I do have a question – Are your fluorescent lights just the type one would buy for a workshop, with daylight blubs or are they something special? Thanks for your comment, I’m sure you have inspired others. If you know anyone else who might like to talk about their space please share this post.