Category Archives: studio

Treasure Tray

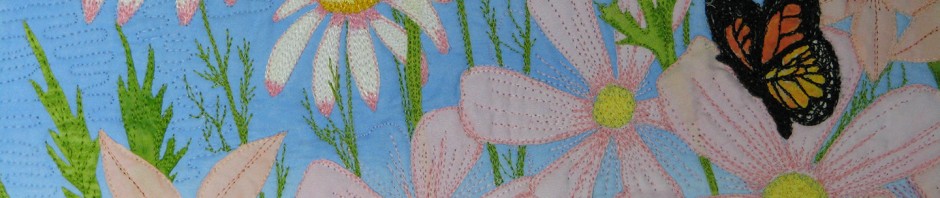
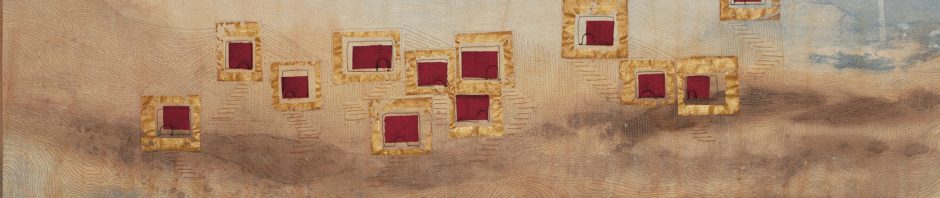
I’m not a scrapbooker… But in my studio I have a this tray which holds bits and pieces from people and places; little reminders of trips we’ve (mostly they have) taken or simply items of a shared love or interest. The can and do inspire my art.

Some times I paint rock or make paintings of rocks (See the inspiration rock on the tray beneath the Emu egg shell)

I love lines…

An oolite (I do believe) in the dark stone and the gray stone with a black line that goes completely around (maybe inside) and a tiny, naturally embossed letter “T”…

and lines on a shell that remind of people standing in the sun to make long shadow line with their bodies.

Jasper with it’s ribbon or wood grain type folds. So smooth inside yet with a rough and coral like outer surface.

There is a small piece of wood, written on in my mother’s hand Palm Springs March 22, 1971 San Jacinto Mt 8,516 ft. My folks were camper van travelers.

Some of the objects have been added just because I have this thing for texture…

This shell looks like crepe paper to me
The beautiful Rose Gypsum

There are pieces of metal (a leaf, of course) and glass (this piece with glitter).

And one of my favorites; a slice of agate that makes me feel like I’m standing on a hill above the beach watching the waves roll in. Can you see it or something else?

Cutting Through the Clutter

I was having a hard time working in the studio and decided it was time to clear away the clutter and make an enjoyable work environment again.

design table mess
design table clear again

The advantage of having the space I have is there are many places to store things… the disadvantage of having the space I have it that there are too many places to shove things!
And shove I did, until reaching for anything caused an avalanche and finding what I was looking for took precious time away from making art.
So the other day I brought in a six foot table and took everything out of one side of one cabinet. Tossed, sorted, filled and labeled containers. Cleared off the design table and one of the sewing tables. There is still half of the room and the quilting machine table to clear (I know there is a machine under there somewhere!) but already I feel better and I’m off to sandwich a quilt!

studio cupboard better

I hope you have a peaceful and happy place to spend this New Year do what you love! Quilting Away, Ann

Sewing Space Tip

I’m videoing more in the studio and so I needed to rearrange the space, again. This turned out to be great. Besides cleaning up those sneaky dust bunnies I ended up moving existing (Ikea) cabinets to the sides of my HQ Sweet Sixteen.

sewing set up

image 1

They are the perfect height and extend the surface about two feet, eliminating much of the drag on larger quilt projects. But it also meant I no longer had the small drawer unit at my right. No problem, just stick the three items most used on the outside of the wooden cabinet that is now on my right – The little screw driver for the bobbin tension, clipping scissors and a bag for thread bits. I’m back in business!

quilting sew up

image 2

I’m quilting an art quilt now that has over fifteen different thread colors (four different brands) and I have gotten really fast at changing the thread; top and bobbin, and adjusting the tension. Did you notice the little drawing by the gloves in the photo (in image 2)? Even though I have adjusted the top thread tension assembly many times, I still seem to have a brain burp when it comes to which way to turn the dial. When I bought my machine the wonderful sales person draw this little picture in my manual for quick reference. Most people would probably have it memorized but a quick glance at this little drawing works for me.

How have you made your sewing or quilting space work for you?

Fabric Storage in the Studio

I re-purposed several bookcases when I moved my studio back into my home. Bookcases are great because they are narrow and so don’t take up a lot of floor space (mine even have doors) but most standard storage boxes either don’t fit or don’t use the shelf space fully. My solution was to design and construct boxes to fit the way I wanted to use the space. The boxes are good for storing fat quarters but most any size yardage can be folded to fit. They can be stacked two high and they have little windows so I can quickly see what color is in each box. They can be easily pull out when I want to go on a serious fabric search. image for 980

fabric bookcase

These boxes fit a minimum 22″ wide shelf. I have them in a 33″ wide bookcase so I have room along the side of the boxes for a few other items. I’m planning to make some more boxes to fit in a 16″ x 11″ bookcase which is filled (and a mess) with landscape and painted sky fabric. They could be made just about any size, though, I would not go bigger than the one in my lessons (viewable on Curious.com and – YouTube) because foam board and hot glue are only so strong and fabric can get heavy!

If this helps you better organize your fabric I would love to hear about it… and remember these boxes could be used to hold other items too.

Stitching and Painting Away, Ann

Getting in there and finishing…

Well, I’m back! August was a month of many projects or should I say the beginning of many projects… and the finish of a few. I wonder if you have had that same situation (I hate to call it a “problem”), discovering so many new techniques, materials, and products to make art that at times it’s hard to focus and finish up the ones previously started.

During the month of August I had the pleasure of being invited to be one of the guest artists on the great blog “…And Then We Set It On Fire…, if you haven’t checked it out I would highly suggest you do. There you will find a wealth of surface design, mixed media, and fiber art ideas being explored (and finished) by several talented artists. They are so fantastic to share their wonderful creations, how they got there and even the mishaps along the way.

Coming in October to the Poway Center for the Performing Arts the SAQA exhibition “Shades of Passion.” I’m excited that two of my art quilts have been accepted into the this exhibition and after seeing the line-up of artists I’m honored to have my work included.

Now I’m in the studio working on more pieces for upcoming workshops in 2015!

Here are some bits and pieces, all works in progress, of what’s been happening in the studio in the past few weeks ~

feathered shore
the watchers
wild rose scape
could go

Moving and a little free motion

I moved my studio and have been trying to get back into the swing of things. I had a painted whole cloth that I actually started quilting ages ago but put away because I was unhappy with the quilting. After the studio move I decided, rather than moving that piece from cupboard to cabinet many time over, I would cut it apart – part it out! So here is a little bit of that whole cloth, salvaged and free motion quilted… I’m trying to get comfortable working/playing in my new (smaller and much less private) space. Sometimes we just have to sit down at the quilting (or sewing ) machine and move on.

About this piece – As I said it is a portion of a larger hand painted piece. It is really free motion quilted which means I didn’t mark it. It has wool batting which quilts beautifully. I just started with one flower and filled in every space for a tight and balanced design. Oh, I’m feeling better already!

getting groove quilting

“New” studio and bobbin storage

I’m in the process of moving my studio. Though I dream of building a studio above our garage that isn’t in the cards for now. I’m going from a large space with a utility sink to a smaller room and it’s a major change but there is something I won’t be changing – The way I store my large quilting bobbins. It’s not fancy but it works well for me and the drawer is directly next to me when I sit at the quilting machine. Here is what I did – Using a foil or other stiff cardboard roll (paper towel rolls are not stiff enough and are too big in diameter), slice it in half lengthwise and hot glue craft foam or cardboard to each end (I used 1/4″ thick craft foam). Glue the ends on so that they makes “feet” and when placed in the drawer it won’t roll over.

bobbin holder
bobbins in drawer
Looking down into the drawer.

Do you have a clever (and cheap) studio storage solution? I’d like to hear it.