Category Archives: Tutorials

Pumpkin Two Ways

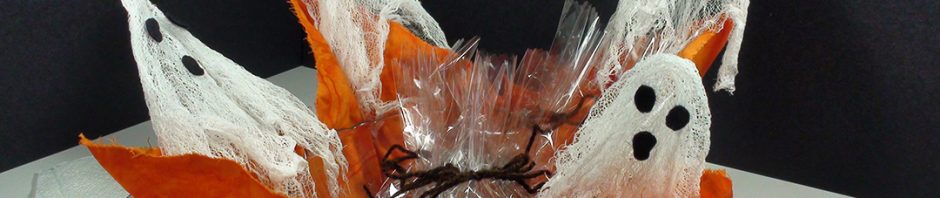
First, in case you didn’t catch it, I had the date wrong for the Oct hummingbird notecard set giveaway. It will be announced next post, Oct. 27, rather than the 25th. I’ll still close entry on the 23rd.

In an early post about printing fabric on brown paper bags I shared a painted and embroidered pumpkin done on one of the background fabrics. Here is the demonstration video. It was a fun project, maybe it’s just this time of year, but I really enjoyed sitting and stitching by hand. Do you do hand needlework and if you do, is there a time of day, month, and/or year you are most in the mood for it?

After embroidering one big leaf I wasn’t happy with it so I ripped it out. I finished everything and left the leaves in an outline. It wasn’t working for me, so I had to decide outline, or embroider, or paint them. After a little consultation with my artist daughter, we decided painted leaves would go best with the painted pumpkins. I think we were right!

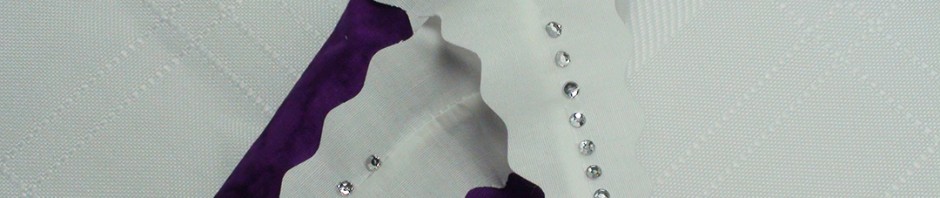
It Looks Like Watermelon to Me

I’ve put together two little fabric packets. One (#1) is white, blue, and red and the second (#2), what I’m calling watermelon/lavender, for the July giveaway/sweepstakes. Let me know which one (or either) you’d like a chance to win by following the rule instructions below.

Here’s the How-to video showing how I painted the watermelon colored fabrics that is in giveaway packet #2.

Fabric packet #1 The flower pieces are 13″x10″ and 15 1/2″x8 1/2″, the Arashi/Shibori is 22 1/2″x 17 1/2″
Fabric packet #2 Flower piece is 11 1/2″x16 1/2″, Lavender/crackle is11″x11 1/4″, Rope wrapped is 16″x12 1/2″

Sweepstakes/giveaway begins July 21, 2021 and ends at 9pm (Pacific Time) July 26, 2021.

To enter: You must live in the US only (no international entries). One entry per person. NOTE: (If applicable) If your name is drawn as the first winner it will be removed for the second drawing.

Leave a comment that you would like to win – #1 (white, blue, red) either/or #2 (watermelon/lavender) and include your first and last name (or last initial).

On July 27, 2021 I’ll use a random drawer and announce the winner/s on my next blog post. Winner/s will email me their mailing information and I will mail the ­­­­­­­­­­­­­­­­fabric packet ASAP. If I don’t hear from the winner within five days of drawing date, I will run another random draw. Good luck!

Made it to November

This is a full post, feel free to share it with anyone you think would enjoy the project videos and artwork.

October was crazy around here. My husband went in for his second procedure only to find out all was corrected during the first, so happy about that…cycling can commence!

Our daughter is finally back from Russia and we made it through quarantine.

Our old cat was diagnosed with kidney disease so I have learned how to give injections. I could stick a needle in things all day long but could never watch needles going into skin. It still makes me queasy but we do what we have to do, right?

And still we are more fortunate that so many.

During the past two months I have made a few videos and have been thankful to be able to work on more projects for Visions Art Museum member challenges. There is another new project coming later this month. I’m posting the video projects below.

And now I have started a November challenge – #Needlevember, everyday this month I’ll be posting a stitched piece (think Inktober-ish). Here are the first five days; I’ll be adding day 6 to my Instagram page later today. Would love for others to take part in this November challenge just use #Needlevember and post on Instagram and Facebook.

As always I appreciate you stopping by.

Painting Fabric Pinwheels

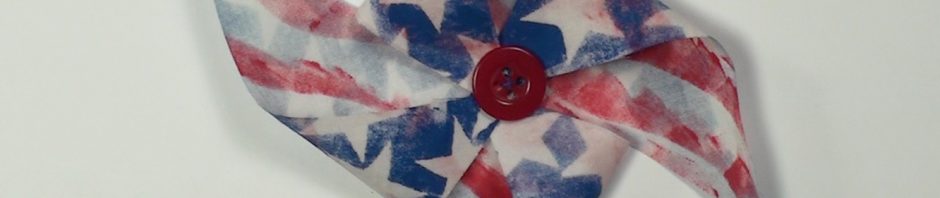
I rarely make patriotic art but I wanted to make pinwheels using fabric and paint and since the 4th of July is approaching this turned out to be one of those rare occasions.

I reached for the Terial Magic spray stabilizer. It worked great, making the fabric behave like paper. Here is the finished piece and the step I took to make the pinwheels…

I like how the pinwheels seem to be lifting the pot off the ground like a hot air balloon!

I started by treating white fabric with Terial Magic and cutting three inch squares.

Apply star stickers (I made these) to treated white fabric.
Use a sponge and acrylic paint, dab over the entire surface.
Let dry (it dries quickly) and remove stars (if the stars are still sticky save for other projects).
Cut a wavy line through card stock to make the stencil.
Flip the square over and use another color paint and a sponge to dab just to one side of the stencil (for a less formal stripe).
For a more formal stripe – after cutting a curvy line in the card stock, tape the two pieces together leaving a 1/4″ gap.
Once the piece is dry fold it in half diagonally, open out and fold the other direction corner to corner again.
Now cut from the outside corners to a little past half way up on each creased line.
Bring every other corner up to the center.
I apply a piece of tape to hold while I get the thread and needle ready.
Use a needle with a double length of thread and remove the tape.
Start on the back side in the center and push the needle and thread through to the front. I like to use a thimble to help push.
Catch each point in a clockwise fashion and pull thread tight. Stitch through to the back and come up again to secure.
Grab the button and stitch it on, then flip to the back and tie off the thread.
And we have made a pinwheel!

I can imagine these being painted for many occasions or used to decorate a room. They would be fun to make with kids and glue could be used instead of needle and thread.

If you make fabric pinwheels I love to see your creations!

A Little Fiber Fun

I’m finally getting back into the swings of things now that my studio has been relocated (yes, again!), maybe for the last time. Being settled in (and the time of year) gave me an itch to make something different. It’s still fiber and fabric, just not in an art quilt sort of way. If you read my blog you know I love exploring ways to use Terial Magic spray stabilizer and though I have made cheesecloth ghosts for years, using Terial Magic was so much easier than using glue or other gel medium type products.

The following tutorial is for a Halloween Ghost Candy Bowl. It is a simple and depending on your weather (it’s been in the nineties here!) a quick project. The instructions and supplies may be found here.

If you are adventurous; stitching, spiders and webbing could embellish the bowl.

hallo-ghosties-bowl-1
hallo-ghosties-bowl-2
hallo-ghosties-bowl-3
hallo-ghosties-bowl-4
hallo-ghosties-bowl-5
hallo-ghosties-bowl-6
hallo-ghosties-bowl-7
hallo-ghosties-bowl-8
hallo-ghosties-bowl-11
hallo-ghosties-bowl-10

Leaf Napkin Ring How to Video

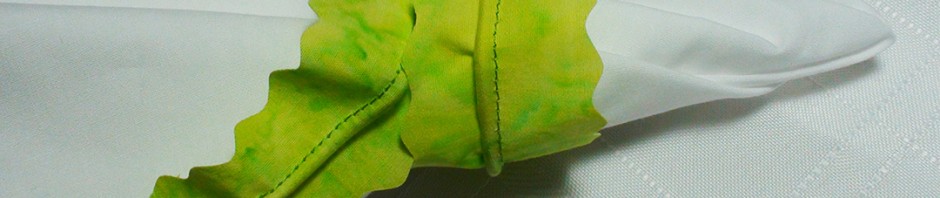
For those of you who prefer a video over a image by image tutorial here is the How to Make a Leaf Napkin Ring video from my Fiber Designs by Ann YouTube channel. If you make these rings I would love to see your creations!

Also, I’m looking forward to publishing more hand painted fabric videos.

Thanks for stopping by!

Ann

Still Here and Kicking!

There has been much going on and I have been bad about focusing posting.

I was happy to learn that the Water is Life quilt exhibit at the United Nations Geneva has been extended for the second time and will be up until April 11, 2016. I’m really looking forward to seeing the quilts when they come to the States in 2017. I’m very proud to have a quilt in that exhibit. From what I have seen it looks like my quilt may be one of the simplest in design, other than it being a triptych, but that’s OK… sometimes simplistic says a lot.

In other news Terial Arts shared my Leaf Napkin Ring design on their blog recently and using my pattern, the owner Terry McFeely,  made a pretty blue fabric napkin ring with a sequin detail.

terry terail arts photo leaf napkin ring

It’s fun to see what others do with a design to make it their own. I’ll be posting a How-to instructional video for making the Leaf Napkin Ring on my YouTube channel soon.

More news coming soon.

Loving Leaves

If you were to look around my home you would see that I love leaves. I have leaves on curtains, knobs, light fixtures, vessels, and beautiful lacy copper leaves hanging on the wall. Using leaves as inspiration, here is one of my most recent designs and tutorials for a simple to make fabric Leaf Napkin Ring. For the printable pattern and instructions see the Patterns & Supply Lists tab here on my blog.

1 leaf napkin ring white
4 transfer pattern to freezer paper
5 press pattern to center line on fabric
6 fold and cut out
7 remove pattern and fold lengthwise
8 sewing casing
9 insert wire
10 open out smooth seam
11 slip on napkin and shape

Here are a couple variations. Place the seam up if using a color fabric and jazz another up with rhinestones! A straight blade rotary cutter may be used instead and free motion veins could be added too. Do you have any other ideas?

3 leaf napkin ring batik
2 leaf napkin ring rhinestoned

Becoming Unstuck

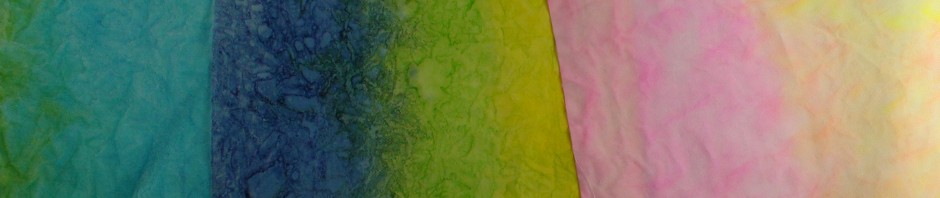
I’m happy to say I haven’t been artistically “stuck” in a while, in fact I wish there were more hours in the day or fewer ideas in my head! The other day I was thinking about ways to get unstuck and decided to see how fast I could produce fabric backgrounds just using areas around our garden. So my son handled the camera and videoed me for fifteen minutes as I traveled from one place to the next. I came up with five rubbings that I look forward to using in future pieces.

The pastel painted only with water.
The wax pastel painted with only water.

It was a hot day and I was using Neo-Color 2 wax pastels so I had to be quick (they melt). I did have a plan before I went outside but I didn’t anticipate the breeze and heat.The fact that my son had to go to work had me moving faster too! I went from flagstone to patio to the shed siding and then to the fence boards and a mosaic…

leaves on flagstone
leaves flagstone rub
patio pre rub
patio rub
patio rub fin
patio to shed
patio to shed fin
fence board
fence board fin
mosaic
mosaic-fin

These first layers can be a great way to get the creative juices flowing again. Have you ever been “stuck” artistically? What have you done to get unstuck?

Fabric Storage in the Studio

I re-purposed several bookcases when I moved my studio back into my home. Bookcases are great because they are narrow and so don’t take up a lot of floor space (mine even have doors) but most standard storage boxes either don’t fit or don’t use the shelf space fully. My solution was to design and construct boxes to fit the way I wanted to use the space. The boxes are good for storing fat quarters but most any size yardage can be folded to fit. They can be stacked two high and they have little windows so I can quickly see what color is in each box. They can be easily pull out when I want to go on a serious fabric search. image for 980

fabric bookcase

These boxes fit a minimum 22″ wide shelf. I have them in a 33″ wide bookcase so I have room along the side of the boxes for a few other items. I’m planning to make some more boxes to fit in a 16″ x 11″ bookcase which is filled (and a mess) with landscape and painted sky fabric. They could be made just about any size, though, I would not go bigger than the one in my lessons (viewable on Curious.com and – YouTube) because foam board and hot glue are only so strong and fabric can get heavy!

If this helps you better organize your fabric I would love to hear about it… and remember these boxes could be used to hold other items too.

Stitching and Painting Away, Ann