Tag Archives: home decor

Challenges

I was scrolling through Instagram recently and noticed several people taking part in different time sensitive or daily challenges. Back in November 2020 I challenged myself, and anyone interested in joining me, to Needlevember. Each day in November I/we would share something we stitched. I enjoyed the stitching but having something to show every day felt like pressure rather than pleasure. I know challenges are more fun when more people share their pieces too, but I went solo.

I’ve enjoyed creating challenge projects for Visions Art Museum Stir Crazy member challenge, I especially like that there’s no time frame for getting any of them finished. A few other artists have created project too. The idea of these projects, during the pandemic, was to find and use materials and objects you may already have around the house. VAM asked me to come up with another project for May.

The May project is mixed media but doesn’t include stitching, though I do show how I made one simple white fabric flower; these same flowers I used in my Unmaking the Soul piece…

Unmasking the Soul detail of the fabric flowers that have been colored with Neocolor ll wax pastels.

Here is the May Spring Wreaths project.

If you know anyone who may like to try a project like these Spring Wreaths, I hope you’ll share this post or the video. Thanks!

Painting Fabric Pinwheels

I rarely make patriotic art but I wanted to make pinwheels using fabric and paint and since the 4th of July is approaching this turned out to be one of those rare occasions.

I reached for the Terial Magic spray stabilizer. It worked great, making the fabric behave like paper. Here is the finished piece and the step I took to make the pinwheels…

I like how the pinwheels seem to be lifting the pot off the ground like a hot air balloon!

I started by treating white fabric with Terial Magic and cutting three inch squares.

Apply star stickers (I made these) to treated white fabric.
Use a sponge and acrylic paint, dab over the entire surface.
Let dry (it dries quickly) and remove stars (if the stars are still sticky save for other projects).
Cut a wavy line through card stock to make the stencil.
Flip the square over and use another color paint and a sponge to dab just to one side of the stencil (for a less formal stripe).
For a more formal stripe – after cutting a curvy line in the card stock, tape the two pieces together leaving a 1/4″ gap.
Once the piece is dry fold it in half diagonally, open out and fold the other direction corner to corner again.
Now cut from the outside corners to a little past half way up on each creased line.
Bring every other corner up to the center.
I apply a piece of tape to hold while I get the thread and needle ready.
Use a needle with a double length of thread and remove the tape.
Start on the back side in the center and push the needle and thread through to the front. I like to use a thimble to help push.
Catch each point in a clockwise fashion and pull thread tight. Stitch through to the back and come up again to secure.
Grab the button and stitch it on, then flip to the back and tie off the thread.
And we have made a pinwheel!

I can imagine these being painted for many occasions or used to decorate a room. They would be fun to make with kids and glue could be used instead of needle and thread.

If you make fabric pinwheels I love to see your creations!

Leaf Napkin Ring How to Video

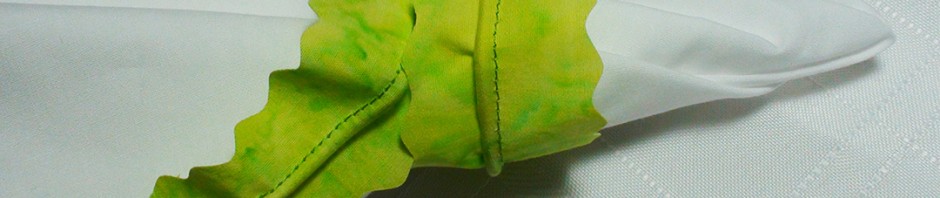
For those of you who prefer a video over a image by image tutorial here is the How to Make a Leaf Napkin Ring video from my Fiber Designs by Ann YouTube channel. If you make these rings I would love to see your creations!

Also, I’m looking forward to publishing more hand painted fabric videos.

Thanks for stopping by!

Ann