Tag Archives: tutorial

Photo Paper Fabric

After I figured this out I noticed that other people online have used photograph printer paper in place of Yupo paper for watercolor and ink. I didn’t look to see if anyone was doing exactly what I am, which is to use acrylic paint (textile and regular) and print/paint fabric from it. When done well, I ended up with not only a piece of fabric but a piece of paper that could be used in other projects too.

I made several pieces that didn’t make it into my new videos (below). The camera was on for some of them but I’m not sure if I’ll ever edit and publish them. Anyway, it was a lot of fun and I could have painted fabric and paper for hours, just to see what would happen if…

Here are a few of the pieces.

The paint spreads on the fabric, depending on how heavily and thick it is applied to the paper.

I love the paper piece (below) from this flower piece more than the fabric. It could be stitched on, added to collage, or framed just as it is. There’s a lot that could be done with the fabric too… I think I’ll probably hand embroider on it.

I used different tools to get different outcomes. For the flower piece I used a tiny metal tip on the paint bottle and painted/printed the green. Then I used a dot tool and added first the violet color to the paper and printed/painted the fabric a second time. Then lifted it and added orange to the paper and laid the fabric on the paper for the last time.

This is the photo paper after the fabric had been lifted off.

These are just more exploring with different tools and layering. I used the tiny tip again, a mist bottle, a cheap bristle brush, an eyedropper, just poured from a little container, and of course, my fingers! I still need to heat set, maybe rinse, and press them.

I have two new videos, one shows how I painted the fabric using this technique, the other I showed in my previous post. Not my best videos but they do go through the How-to of it.

Changing Ways

I laugh when I think back to the days when I would only work on one project at a time, start to finish, and they were usually pretty big size (quilt) projects. Now I’m usually working on at least three projects at a time. Maybe it’s because I’m older and there are so many things I still want to try.

I was hoping to have this one finished but some days just don’t go as planned, I’m guessing you know what I’m talking about.

This is the mini landscape in a leaf that I designed a while ago. The sky and water are my hand painted fabric, the other pieces are commercial fabrics. Below are some of the process steps. As I worked on this I thought about how I would be so much more comfortable doing all of it by hand – the applique, even the quilting. I have always felt happier, more in control, doing hand applique and quilting. All of my early miniature landscape were made by hand, and ti’s the way I have taught mini fabric landscapes to students. But now that changes day to day and I’ve had to change my ways; raw edge fusing, machine quilting and sewing have allow me a better chance of getting projects done in my lifetime!

To begin – The little landscape pieces were positioned on Wonder Under, pressed and the leaf cut out. Usually I would remove the paper and then cut it out but in this case it was easier for me to cut it out with the backing paper still on the back.

I measured and cut freezer paper about the size of the finished quilt and pressed it onto the black background fabric. Next I positioned and held a cardstock leaf pattern on the freezer paper and drew around it, then I extended the landscape lines out from the edge of the leaf. I numbered them from furthest back to the most foreground piece.

I cut them apart and removed the pattern and freezer paper. Next I pressed/fused the leaf in place on the the background fabric. and ironed the freezer paper pieces in order, back in place (like a puzzle), leaving a little gap; a bit of trimming was required so there would be a gap. BTW – This could be the makings for “stained glass” style quilt too.

Then I used a Chaco liner and drew in the gaps. I drew quilting lines for the sky, and then wiped them away, and tried a few more times until I found a design I liked.

Here the leaf, sky, and landscape extension lines have all been quilted – blue thread for the sky and a gray for the landscape. I started to close quilt using color thread within the extension sections, out from the landscape elements and sky, but it was not a good day for that…

Early on I knew it wasn’t a good day for me to be quilting. But instead of quitting for the day like I should have, I ripped out colored thread quilting and grabbed black thread. I’m thinking about dry brush painting some of the outside edges of the black quilting. I’ll have to think on that after I finish all of the black quilting… we’ll see!

Reminder – Next post I’ll be announcing the Leaf Decorated Box winner.

As winter and the holiday seasons approach I hope you will be safe and find some time just for you.

A Fix and Giveaway

This little piece has been on my design wall unfinished for a while. It was a cut of a larger piece of hand painted fabric that I free motion quilted just for fun. I can’t even remember if I filmed while I was quilting it. I couldn’t figure out how to finish it, to fix it until a few days ago.

I’m happy to say I fixed it and you can see what I did here…

The November giveaway, sweepstakes item is this little leaf decorated box. It’s hard pressed paper and only the top is decorated. I used painted (mop-up) fabric leaves, a couple papers, burned matches, grave vine, and gold paint spatters. It measures 6 1/2″ x 4″ x 2 5/8″ tall. It could be used as is or it could be painted, papered, or embellished in a multitude of other ways. But there’s more… I’ll be putting a little something extra inside the box.

If you are interested in a chance to win the leaf box with surprise inside just follow the rules below. The winner’s name will be announced on my December 1, 2021 blog post.

Sweepstakes/giveaway begins November 10, 2021 and ends at 9pm (Pacific Time) November 28, 2021.

To enter: You must live in the US only (no international entries). One entry per person. Leave a comment that you would like to win the leaf box with surprise, and include your first and last name (or last initial).

I’ll use a random drawer and announce the winner on my Dec 1 blog post. Winner will email me their mailing information and I will mail the ­­­­­­­­­­­­­­­­leaf box with surprise ASAP. If I don’t hear from the winner within five days of drawing date, I will run another random draw. Good luck!

It Looks Like Watermelon to Me

I’ve put together two little fabric packets. One (#1) is white, blue, and red and the second (#2), what I’m calling watermelon/lavender, for the July giveaway/sweepstakes. Let me know which one (or either) you’d like a chance to win by following the rule instructions below.

Here’s the How-to video showing how I painted the watermelon colored fabrics that is in giveaway packet #2.

Fabric packet #1 The flower pieces are 13″x10″ and 15 1/2″x8 1/2″, the Arashi/Shibori is 22 1/2″x 17 1/2″
Fabric packet #2 Flower piece is 11 1/2″x16 1/2″, Lavender/crackle is11″x11 1/4″, Rope wrapped is 16″x12 1/2″

Sweepstakes/giveaway begins July 21, 2021 and ends at 9pm (Pacific Time) July 26, 2021.

To enter: You must live in the US only (no international entries). One entry per person. NOTE: (If applicable) If your name is drawn as the first winner it will be removed for the second drawing.

Leave a comment that you would like to win – #1 (white, blue, red) either/or #2 (watermelon/lavender) and include your first and last name (or last initial).

On July 27, 2021 I’ll use a random drawer and announce the winner/s on my next blog post. Winner/s will email me their mailing information and I will mail the ­­­­­­­­­­­­­­­­fabric packet ASAP. If I don’t hear from the winner within five days of drawing date, I will run another random draw. Good luck!

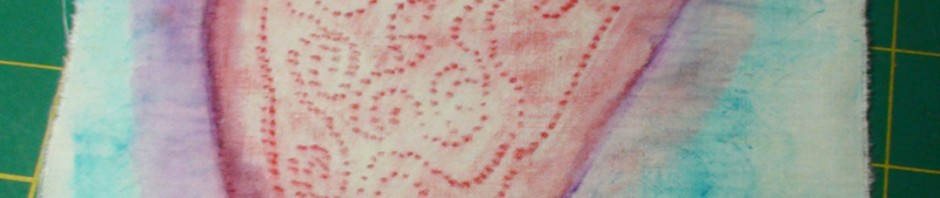
Painted Fabric – Cardboard Resist

This is the first cardboard resist piece I made, it was made on a painted (light wash) piece of fabric and I used two colors for the design. Read on to find out more and for the How-to video see below.

For this next piece I left some of the backside tip fabric unpainted (no yellow), once dry and pressed I painted orange dots to the centers. I didn’t like that result, they felt too deliberate. The holes were in a tighter placement and I don’t think the overall results were as good, BUT maybe it’s just the colors; I think these colors would have been more striking on a white background.

Below is the only piece (so far) painted on white fabric, the picture doesn’t show how pretty it really is. I forgot to take a photo before I cut some pieces out, that’s the photo-shopped out white areas.

The next piece didn’t go as I had hoped. I started with a piece of rope wrapped fabric in green (more about that in a future post). I used three colors on the green background, which was an okay idea, but again the holes were too close. I’ve concluded that there needs to be more fabric and space between the holes.

I did use the the above fabric but it doesn’t look anything like it did after painting. In my previous post I share the crackle/crinkle painted fabric and said I’d try to share an artwork using that technique and this newest paint technique. Here it is… Mixed media collage, raffia, coffee filter, and hand painted fabric. I may talk about the background wall fabric in a future post.

Untitled. Approximately 15.5″ x 11.5″

I learned more… One – I wanted the vase to be shiny so I painted Mod Podge on it, when it dried it was shiny BUT the crackles and crinkles were no longer visible. And two – Dry Mod Podge is really hard to wash out of fabric! I ended up flipping the fabric over and that worked fine, it’s actually darker than it appears in this photo.

After painting a few pieces I have more ideas for using this technique. If you paint fabric using any of these techniques I hope you’ll share your results.

Stay tuned for the next sweepstakes/giveaway announcement.

Challenges

I was scrolling through Instagram recently and noticed several people taking part in different time sensitive or daily challenges. Back in November 2020 I challenged myself, and anyone interested in joining me, to Needlevember. Each day in November I/we would share something we stitched. I enjoyed the stitching but having something to show every day felt like pressure rather than pleasure. I know challenges are more fun when more people share their pieces too, but I went solo.

I’ve enjoyed creating challenge projects for Visions Art Museum Stir Crazy member challenge, I especially like that there’s no time frame for getting any of them finished. A few other artists have created project too. The idea of these projects, during the pandemic, was to find and use materials and objects you may already have around the house. VAM asked me to come up with another project for May.

The May project is mixed media but doesn’t include stitching, though I do show how I made one simple white fabric flower; these same flowers I used in my Unmaking the Soul piece…

Unmasking the Soul detail of the fabric flowers that have been colored with Neocolor ll wax pastels.

Here is the May Spring Wreaths project.

If you know anyone who may like to try a project like these Spring Wreaths, I hope you’ll share this post or the video. Thanks!

Painted Tree Fabric Giveaway

I’m learning to use my hand and arm again but I had no idea it would be such a challenge. I’ve always said making art is my therapy but now it is literally my physical therapy!

I enjoyed painting this tree fabric but I wasn’t sure what I would do with it so I decided to give it away. The fabric is 100% cotton and measures approximately 17 3/4″ x 16 3/4″ and it’s been washed (no soap) and pressed dry.

If you are interested in a chance to win this painted tree fabric follow the rules below. If you know anyone you think may be interested in a chance to win this fabric, feel free to share this post and video.

Sweepstakes/giveaway begins April 14, 2021 and ends at 9pm (Pacific Time) April 26, 2021.

To enter: You must live in the US only (no international entries). One entry per person. Leave a comment that you would like to win the Painted Tree fabric and include your first and last name (or last initial).

On April 27, 2021 I’ll use a random drawer and announce the winner/s on my next blog post. Winner will email me their mailing information and I will mail the ­­­­­­­­­­­­­­­­Painted Tree fabric ASAP. PLEASE NOTE – If I don’t hear from the winner within five days of drawing date, I will run another random draw. Good luck!

Easy Additions

In the past when I presented live lectures to quilt guilds, one of the talks was about making the quilt more our own. We often use one main fabric to help select the other fabrics in a quilt, this is a twist on that. During my recovery ironing is not happening so please excuse any wrinkles.

Here are some examples of commercial fabrics with easy additions.

Above is a pretty floral fabric and nice black on white. With the addition of a stamp the black/white becomes a coordinating fabric and there’s more to quilt around.

The stamp was made by cutting thin craft foam into leaf shapes and gluing them onto scraps of Lauan (Sometimes I use Masonite and even cut-up sturdy box cardboard for stamp base and handle). Then I scored down the center of the leaves for added interest. Next I placed the fabric on a slightly cushy surface. Using a makeup type sponge, I applied craft acrylic paint onto the leaves, then stamped the leaves onto the fabric.

Another floral fabric needed something more vibrant so I used my Sharpie Stained markers. So simple and fun. Notice on the right side, even the addition of just a few orange dots make this fabric more lively.

Sometimes the fabric combinations are unexpected.

Jacquard Textile Color in apple green and a paint brush made specifically for applying paint to fabric.

Here the gingham inspired the squares for the stamp which was made using a thick craft foam. The paint is Jacquard Textile Color in Fluorescent Yellow.

Another floral fabric and a three leaf stamp on gingham.

Below, this beautiful jewel tone design on black fabric has so much potential, both with coordinating and customizing. The blue coordinating fabric inspired this next stamp and I love the look on the polka-dot fabric.

The last and simplest idea… To softens the dark/jewel tone fabric I pulled in a cream floral and used craft acrylic paint and a new flat pencil eraser.

The orange dots added just enough kick of color to make the subtle fabric work better with the darker.

Hard to tell here but the color of the cream fabric actually is in the dark fabric.

As I revisit these pieces it really gets my creative juices flowing. I hope these examples sparked some ideas in you.

Painting Fabric Pinwheels

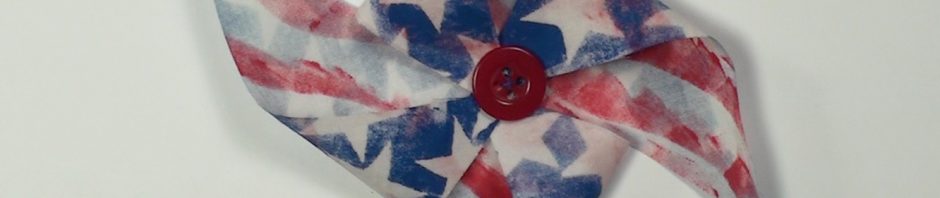
I rarely make patriotic art but I wanted to make pinwheels using fabric and paint and since the 4th of July is approaching this turned out to be one of those rare occasions.

I reached for the Terial Magic spray stabilizer. It worked great, making the fabric behave like paper. Here is the finished piece and the step I took to make the pinwheels…

I like how the pinwheels seem to be lifting the pot off the ground like a hot air balloon!

I started by treating white fabric with Terial Magic and cutting three inch squares.

Apply star stickers (I made these) to treated white fabric.
Use a sponge and acrylic paint, dab over the entire surface.
Let dry (it dries quickly) and remove stars (if the stars are still sticky save for other projects).
Cut a wavy line through card stock to make the stencil.
Flip the square over and use another color paint and a sponge to dab just to one side of the stencil (for a less formal stripe).
For a more formal stripe – after cutting a curvy line in the card stock, tape the two pieces together leaving a 1/4″ gap.
Once the piece is dry fold it in half diagonally, open out and fold the other direction corner to corner again.
Now cut from the outside corners to a little past half way up on each creased line.
Bring every other corner up to the center.
I apply a piece of tape to hold while I get the thread and needle ready.
Use a needle with a double length of thread and remove the tape.
Start on the back side in the center and push the needle and thread through to the front. I like to use a thimble to help push.
Catch each point in a clockwise fashion and pull thread tight. Stitch through to the back and come up again to secure.
Grab the button and stitch it on, then flip to the back and tie off the thread.
And we have made a pinwheel!

I can imagine these being painted for many occasions or used to decorate a room. They would be fun to make with kids and glue could be used instead of needle and thread.

If you make fabric pinwheels I love to see your creations!

Heart Art: A Tutorial

I thought I would take a little break from my deadline work and play a bit. I’m not usually a heart art kind of person but this was fast and fun. I’ll leave it to you to think up ideas of where the finished heart could be used… maybe a tiny art quilt, on a fabric purse or tote, or simply framed? If you try it, I hope you’ll let me know what you did with the finished heart. (I apologize for the blurry photos but I’m sure you will be able to get the just of the process).  I love Neocolor ll wax pastels and that is what I used.

heart 1
Start with four pieces of freezer paper the exact same size.
heart 2
Iron three of the pieces together so that the paper side is out (like a freezer paper sandwich), then iron the fourth piece of freezer paper to the other three. Be sure they are lined up well so the freezer paper doesn’t melt onto the iron.
heart draw cut
Next fold regular paper and cut out a heart shape pattern. Then place the pattern on the freezer paper and draw around the heart.
heart draw design
Use a black marker to draw around the heart and then draw a free-style design inside.
bare needle
I removed thread, bobbin and presser foot. You may want to use a free-motion/darning foot but I prefer an open/bare needle. Be very careful if doing it this way.
bare needle stitching
Use a needle that will not be used on fabric ever again. Place the freezer paper heart under the needle and start stitching on the lines. I like to go fast and as you can see I didn’t follow the lines very well and that is just fine. If you go slowly it is easier to stay on the lines but for this project it doesn’t matter.
stitching finished
Cut the freezer paper heart out. This doesn’t need to be perfect unless you would like an even edge.
flip the heart
After all the stitching is done flip the heart over, notice this side is more textured than the other so this is the side to do the rubbing on. Place a piece of cotton fabric over the heart.
heart under fabric
Neocolor ll wax pastels may be used on fabric with water and other liquids and then heat set.
heart rubbing
Hold the fabric while using the wax pastels and rub across the fabric over the heart. I used one color inside and another around the outside edge.
rubbing done
When the rubbing is finished (there will be another rubbing later) removed the heart (this freezer paper heart could be colored and used in another piece of art). Place the fabric on a protected surface.
paint with water
Water and a soft brush used around the outside edge.
paint with water2
Start with only a little water and see how it bleeds before adding more. Notice how bright the pastel becomes.
paint with alcohol 1
Next do the same with rubbing alcohol on the center design. While water really causes the wax to bleed into the fabric, alcohol brightens it without causing it to move as much,
paint with alcohol 2
After the center is done I wadded a piece of foil then opened it out. Placed the foil under the fabric and used another wax pastel color for another rubbing.
heart foil rubbing
Wadded foil
heart foil rub painting
Another color.
heart art
A little more water wash on the blue and then air dry and heat set using an iron. I think it is calling for some quilting!