Tag Archives: rubbings

Fire season and Water is Life

We were hit with a heat wave this week but there seems to be a break today, unfortunately several fires have broken out around the state and county. Knowing how these fire can spread and the damage they cause, especially with the winds we have been experiencing, is always frightening. I live in an area that has remained unscathed by fire but I have friends and family who have lost homes (and pets) in past fires. I’m thankful to the firefighters for what they do every day and admire the strength of those who rebuild and move forward.

On a happier note – Recently I received a Machine Quilting Unlimited magazine in the mail and noticed a banner at the top of the cover that read “Water is Life – Exhibit at the United Nations. A few of the quilts from the Quilt for Change – Water is Life exhibit are featured, including my a triptych Clear Necessity.

So, I’m trying to be careful and not waste too much water while I paint more fabric…forest rays painted fabric1 june 2016 acrylic on fabric june 2016

The left piece was started by painting textile paint wet on wet, then slightly folding and left in the sun to achieve a sun print (the “rays”). After it dried I did a rubbing on a homemade foam leaf stamp using wax pastels and then sprayed the entire piece with water to soften the design. Center piece was tilt painted (Online lesson at Curious.com) and the piece on the right was made by laying a piece of fabric onto a plexiglass sheet that had acrylic paint pooled and dripped on it. Though the acrylic paint ended up thin enough to stitch on (video coming soon, I hope) Next time I will use textile paint so that the hand will remain softer.

If you paint fabric I would love to see your designs. I’m always surprised and usually please when paint meets fabric!

Becoming Unstuck

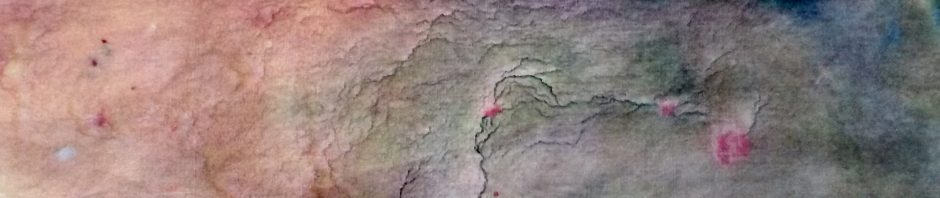
I’m happy to say I haven’t been artistically “stuck” in a while, in fact I wish there were more hours in the day or fewer ideas in my head! The other day I was thinking about ways to get unstuck and decided to see how fast I could produce fabric backgrounds just using areas around our garden. So my son handled the camera and videoed me for fifteen minutes as I traveled from one place to the next. I came up with five rubbings that I look forward to using in future pieces.

The pastel painted only with water.
The wax pastel painted with only water.

It was a hot day and I was using Neo-Color 2 wax pastels so I had to be quick (they melt). I did have a plan before I went outside but I didn’t anticipate the breeze and heat.The fact that my son had to go to work had me moving faster too! I went from flagstone to patio to the shed siding and then to the fence boards and a mosaic…

leaves on flagstone
leaves flagstone rub
patio pre rub
patio rub
patio rub fin
patio to shed
patio to shed fin
fence board
fence board fin
mosaic
mosaic-fin

These first layers can be a great way to get the creative juices flowing again. Have you ever been “stuck” artistically? What have you done to get unstuck?

Heart Art: A Tutorial

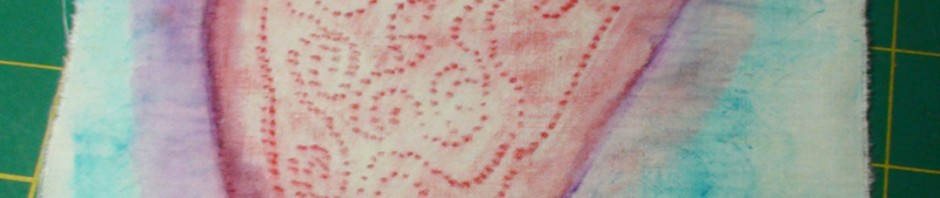
I thought I would take a little break from my deadline work and play a bit. I’m not usually a heart art kind of person but this was fast and fun. I’ll leave it to you to think up ideas of where the finished heart could be used… maybe a tiny art quilt, on a fabric purse or tote, or simply framed? If you try it, I hope you’ll let me know what you did with the finished heart. (I apologize for the blurry photos but I’m sure you will be able to get the just of the process).  I love Neocolor ll wax pastels and that is what I used.

heart 1
Start with four pieces of freezer paper the exact same size.
heart 2
Iron three of the pieces together so that the paper side is out (like a freezer paper sandwich), then iron the fourth piece of freezer paper to the other three. Be sure they are lined up well so the freezer paper doesn’t melt onto the iron.
heart draw cut
Next fold regular paper and cut out a heart shape pattern. Then place the pattern on the freezer paper and draw around the heart.
heart draw design
Use a black marker to draw around the heart and then draw a free-style design inside.
bare needle
I removed thread, bobbin and presser foot. You may want to use a free-motion/darning foot but I prefer an open/bare needle. Be very careful if doing it this way.
bare needle stitching
Use a needle that will not be used on fabric ever again. Place the freezer paper heart under the needle and start stitching on the lines. I like to go fast and as you can see I didn’t follow the lines very well and that is just fine. If you go slowly it is easier to stay on the lines but for this project it doesn’t matter.
stitching finished
Cut the freezer paper heart out. This doesn’t need to be perfect unless you would like an even edge.
flip the heart
After all the stitching is done flip the heart over, notice this side is more textured than the other so this is the side to do the rubbing on. Place a piece of cotton fabric over the heart.
heart under fabric
Neocolor ll wax pastels may be used on fabric with water and other liquids and then heat set.
heart rubbing
Hold the fabric while using the wax pastels and rub across the fabric over the heart. I used one color inside and another around the outside edge.
rubbing done
When the rubbing is finished (there will be another rubbing later) removed the heart (this freezer paper heart could be colored and used in another piece of art). Place the fabric on a protected surface.
paint with water
Water and a soft brush used around the outside edge.
paint with water2
Start with only a little water and see how it bleeds before adding more. Notice how bright the pastel becomes.
paint with alcohol 1
Next do the same with rubbing alcohol on the center design. While water really causes the wax to bleed into the fabric, alcohol brightens it without causing it to move as much,
paint with alcohol 2
After the center is done I wadded a piece of foil then opened it out. Placed the foil under the fabric and used another wax pastel color for another rubbing.
heart foil rubbing
Wadded foil
heart foil rub painting
Another color.
heart art
A little more water wash on the blue and then air dry and heat set using an iron. I think it is calling for some quilting!

Watercolor washed rubbing…

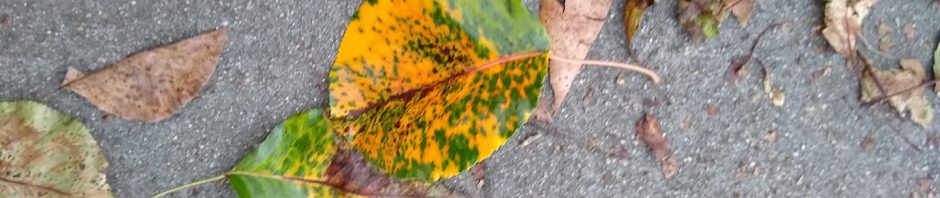
You may have read on one of my earlier posts that we have leaves stamped into our patios and that I have used them as inspiration for some of my art.
Below are the steps to creating what will be a small art quilt OR a piece that could be incorporated into a larger piece. I used a piece of Pima cotton, watercolor (actually Jacquard Textile paints, thinned), water-soluble wax pastel, and bit of painted gauze.

step one
First lay the fabric on top of the imprint, hold securely or tape, and rub with the wax pastel almost parallel with the surface.

step 2

Next heat set it using a hot iron.

rubbing3

Using thinned textile paint, “wash” the paint color over the design.

rubbing4

I was trying to add more depth with the dark but did too much.

rubbing5
rubbing6

Luckily it dried much lighter and presented me with an opportunity to try and alter it by adding another layer – this time using painted gauze.

rubbing7

The gauze covered some of the dark areas and brought in another element and textured layer.

rubbing8
rubbing9

Because I’m pretty sure I’m going to quilt my pieces I like to add dots when painting the background, giving me something to quilt around.

I’m pleased with this piece and will post it again when it is finished.

rubbing top fin

I hope this gives you some ideas to try and I would love to see what you come up with!