Tag Archives: stamping

Working Small

Today I’m sharing four little pieces; you may have seen a couple if you follow me on Instagram. three may still be works in progress (wip). I have really enjoyed working on these tiny pieces. They are made from scraps of other projects and some on pieces of fabric I have had for ages but could never find a way to use until now.

This free motion palm tree on painted sky fabric was from my Needlevember a while back. Now it’s matted and framed.

Mixed media – Stained and painted cheesecloth, dyed silk, stamped dragonfly on silk organza, felt cups, grape wreath vine, and some embroidery.

Below is a piece of fabric I stamped, painted, and printed real and faux leaves, and I’ve have had it for years. Now I will be able to get more than one little piece from it. The one below (wip) has a paper clay leaves (rubbed painted) and beads are from gifted (for altered art) jewelry, silk, and embroidery floss stitching.

You may recognize the painted burlap in this last piece from a previous post and the metallic paper too. I’ve also added fabric coils held on by French knots, and more floss stitches, all on black cotton.

Potato Patato and the Winner

Do you say poyn·seh·tee·uh or poin-sed-uh? Apparently either way is okay, depending on who you ask!

It would be an understatement to say I love flowers and have used them a few times in my artwork. Winter always makes me think of the poinsettia plant and so it’s probably no surprise that once again, I’ve made a poinsettia project.

Here are my new pieces; a notecard and tag, and the video showing how the card was made. I think it would be fun to use this idea for an art quilt too or to change it up with any other type of flower. Ideas, always more ideas.

If you watch the video, thanks, and I hope you enjoy it.

And The Winner of the Leaf decorated box with a surprise inside is – Sylvia Wallace! Congratulations, Sylvia, please email your mailing address to me at fiberdesignsbyann@gmail.com

I understand the end of the year can be a busy time but I’ll have one more sweepstakes/giveaway, and of course more art in December, so if you’re up to it I hope you’ll stop by again.

Stay safe and be good to yourself.

Looking Up, Birds, and Winners

Things are looking up around here, for one reason, we are finally having our ancient furnace, it’s in the attic, replaced. We haven’t used it in several years and though we don’t have horribly cold winters, I’m cold if it’s below 75° and the hands don’t work well with they’re chilly. Space heaters have helped but our old kitty and I are ready for the warmth!

You may remember the cut collage bird I made a while ago using my daughter’s (dry) wet palette papers (mostly). The green wing needed help so I used some of my painted papers. I like it better now and it will probably end up on a notecard.

I started celebrating my birthday early; my (adult) kids surprised me with this box of Aurifil thread. It’s so pretty I haven’t even opened the plastic wrap yet!

I’m working on a project for a private class I’ve been asked to teach. I’m planning on including a stamp in the project so I’ve cut more rubber stamps and one is a little hummingbird. I decided to use this stamp in another project made especially for this giveaway announcement post.

I filmed some of the free-motion quilting for this hummingbird project but haven’t had time to edit it yet. Here are some images of the process and the almost finished piece. I haven’t decided exactly how I’ll finish it for hanging.

The photos are taken with my phone so sorry they’re not the best.

I started with a piece of Timtex cut to about 6″ x 7″ and “mop-up” painted paper towels I’ve been saving.

I placed a whole piece (one ply) of paper towel over the Timtex and tore other paper towel up then arranged it in an abstract floral design.

I set that aside and used black textile paint for the hummingbird on a piece of silk organza. Stamping outline stamps on silk organza is a hit or miss… without stabilizer organza wiggles! I knew I’d be quilting over it so it was no big deal that it didn’t turn out the best.

So that the hummer would be about where I wanted it, I center and laid the organza on top of the paper towel pieces and placed silk pins at the tip of the wing, tail, and the beak. Then I removed the Timtex/paper towel piece and dabbed paint on the stamp, lined up the silk pins with the stamp and laid the organza on top, and sort of burnished it with a little piece of parchment. Hindsight – press organza to freezer paper and then stamp down onto the fabric as usual. Sorry if that is difficult to understand, I think I’ll have to video it if I do it again.

I let the paint dry for a few minutes, then clipped the organza to the Timtex so I could free-motion quilt, starting with the hummingbird. Below is the free-motion quilting finished.

I put black felt behind it and didn’t like it at all so changed to blue (it’s actually more turquoise than it looks in photo). I tried to straighten and trim up the organza but since I’m still not sure where this is going I left it longer on the side. This felt didn’t look good without the organza over it (too bright).

I added a little embroidery around the edge of the Timtex with French knots at each corner. I think I want to add more. I’ll take better photos when it is finished.

Now the sweepstakes/`giveaway – I’d like to thank all who commented and because only two of you entered the hummingbird notecard set giveaway, I have decided to give Joy and Karen each a set of Hummingbird notecards. Whether you keep them or give them away, I hope you enjoy them as much as I enjoyed making them. Please email your mailing address to me (even if you have in the past).

Surface Show

I hoped to have my roadrunner piece finished but between the designing, cutting, and next drying time, it’s going to take longer than I thought it would.

So, I’m sharing some pieces here, I’ve used different painting techniques on them. I’m sure I have shared some of them in the past but I think they are a nice reminder of what we can do when starting with white fabric. They could be done on printed fabric or painted fabric, again. I may not be completely sure what techniques I used on some but I’m sharing as much as I can remember.

Starting with the sweet one…

Chocolate Sauce and Wrappers. I pulled a thinned pint color, with a cheap brush, onto dry fabric and then wet the fabric and did a wash. The “chocolate sauce” was probably done with an eye dropper and then tilted. I hand painted little white highlights to give more dimension. The wrappers are metallic painted fusible in silver and gold.

Clothespin resist painted not dyed. I remember this being really fun to make!

I used the clothespin resist in this abstract that I then over painted. I remember starting to quilt it and not liking where I was going, so I think I put it away or maybe I cut it up! I probably should have just stretched it on a canvas.

Detail from Fallen

For Fallen I used real leaves for stamps and a credit card for the lines. I think I used a pointed round paint brush for the dots. This was a fun one to quilt.

Fallen one from my Photograph on Fiber series.

Detail of Above Lake Cuyamaca

In previous post I shared the how-to quilt and then paint the border. I painted the sky and water and I think the quilting worked well for the ripples in a lake.

Detail Drift and Flow

Drift and Flow has wool batting. I quilted the heck out of this piece on my domestic sewing machine; the last piece I did before getting my sit-down quilting machine. I’m glad the quilting shows in the photo because the black thread on black fabric is difficult to see in person. The black and gray on the right (above) is pole wrapped (same piece as the larger on the left below), and I was thrilled with the results, particularly in the gray area. It looked like hanging leaves. The square (ish) pieces were made by throwing paint down while thinking of sciencey things. The curvy lines are satin stitched and the gold drips are metallic paint tilted to let run and then the piece was cut into four squares.

Dwell detail… Dwell is a painted wholecloth and my most favorite quilt, ever.

Dwell back, this is the quilting that runs the width of the lower back. Sadly, it doesn’t show on the front.
There are simple embroidered “steps” leading down from the silk.

The background fabric was stretched on a frame and painted. The windmills are made from a handmade stencil, the brick rectangles are purchased hand dyed silk, and the gold frames are painted fusible. The binding fabric was painted especially to continue the colors from the main cloth.

I hope you enjoyed this little quilt show and the these pieces have given you some ideas for techniques you may want to try.

Easy Additions

In the past when I presented live lectures to quilt guilds, one of the talks was about making the quilt more our own. We often use one main fabric to help select the other fabrics in a quilt, this is a twist on that. During my recovery ironing is not happening so please excuse any wrinkles.

Here are some examples of commercial fabrics with easy additions.

Above is a pretty floral fabric and nice black on white. With the addition of a stamp the black/white becomes a coordinating fabric and there’s more to quilt around.

The stamp was made by cutting thin craft foam into leaf shapes and gluing them onto scraps of Lauan (Sometimes I use Masonite and even cut-up sturdy box cardboard for stamp base and handle). Then I scored down the center of the leaves for added interest. Next I placed the fabric on a slightly cushy surface. Using a makeup type sponge, I applied craft acrylic paint onto the leaves, then stamped the leaves onto the fabric.

Another floral fabric needed something more vibrant so I used my Sharpie Stained markers. So simple and fun. Notice on the right side, even the addition of just a few orange dots make this fabric more lively.

Sometimes the fabric combinations are unexpected.

Jacquard Textile Color in apple green and a paint brush made specifically for applying paint to fabric.

Here the gingham inspired the squares for the stamp which was made using a thick craft foam. The paint is Jacquard Textile Color in Fluorescent Yellow.

Another floral fabric and a three leaf stamp on gingham.

Below, this beautiful jewel tone design on black fabric has so much potential, both with coordinating and customizing. The blue coordinating fabric inspired this next stamp and I love the look on the polka-dot fabric.

The last and simplest idea… To softens the dark/jewel tone fabric I pulled in a cream floral and used craft acrylic paint and a new flat pencil eraser.

The orange dots added just enough kick of color to make the subtle fabric work better with the darker.

Hard to tell here but the color of the cream fabric actually is in the dark fabric.

As I revisit these pieces it really gets my creative juices flowing. I hope these examples sparked some ideas in you.

Quilt, stamp, or both?

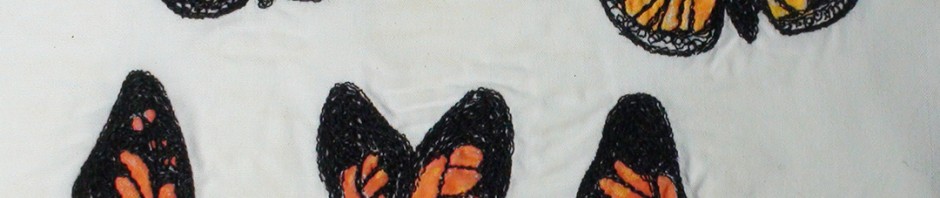
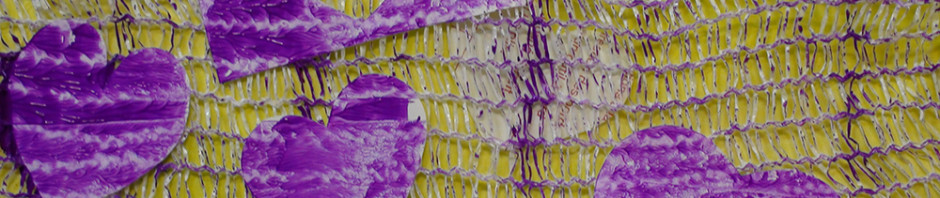
I have this little pillow made from my hand painted fabric that was originally going to have buttons but then I made the Terial Magic, painted and stitched butterflies and had some other thoughts.

butterfly flower pillow
5 butterflies washed

I made a flower stamp out of Sculpey Bake and Bend clay so I could just stamp on the right side of the pillow and add some green leaves.

butterfly pillow flower stamp1
butterfly pillow flower stamp test

Or maybe I’ll just use black thread and quilt a flower design OR maybe I’ll do both…

butterfly pillow flower quilting idea1

What would you do?

Promises promises…

My husband and I celebrate our 35th anniversary this coming week and I guess that is why Valentine’s Day is no big deal to me (that and the fact that I should stay away from chocolate and our cat eats flowers and doesn’t keep them down).

Anyway, in keeping with the spirit of LOVE, I thought I would play a little with hearts. It started as a mono print and ending with questionable results but as always it was fun experimenting. For the last print pictured below I just stuck the contact paper hearts onto the plexi, rolled the paint covered brayer over them and placed the fabric on it. I’m sure if I had used the Gelli Arts print plate the results would have been better.

heart print materials 1
heart print materials 2
heart print materials setup
heart print plexi brayer
purpleheartslarge
Paint on plexiglass then brayed on materials
heart print first attemp
The back was better than the front but still not good…
heart print1
So print over it.

New fabric

Well, I haven’t posted for a while! I have been spending way too much time in the kitchen which I love except that it keeps me from my non-edible artwork. But now it is sunny and I’m happy to be creating more in the studio.

We have had down right hot days here in San Diego so here is a bit of comfort in a fabric piece (a whole cloth) I created in honor of winter…

Cocoa Rings and Marshmallows